We'll start off by getting familiar with your site.
An Abbreviated Tour
Step 1) Visit your site by entering the site address in your browser.
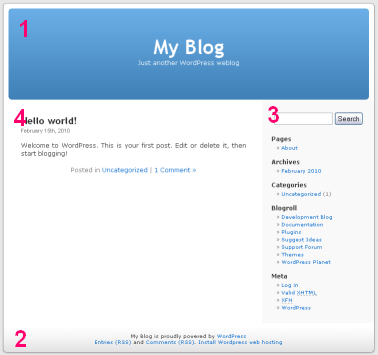
Once the site opens you will see several sections of the page. Don't worry about the look of the site for now. If you like it you can keep it, but we will teach you how to change it later.

(1) Title Area
Across the top of the page is a large section that contains the title and subtitle of your site. We will be changing these later.
(2) Footer
All the way at the bottom of the page is the footer. We won't be changing anything in this section during the workshop.
(3) Sidebar
The sidebar extends along the right side of the page. You can put all sorts of goodies in this section. We'll cover that close to the end.
(4) Content Area
This is the largest area of the page. It is where the main content will be displayed. On a blog page it will show your recent articles. It can also display static pages.
What's in a Name?
Step 2) Go to the administrative dashboard by entering the address in your browser.
Typically, the administrative dashboard can be found by adding "/wp-admin" to the end of your normal site address.
Step 3) Login with your administrator name and password.

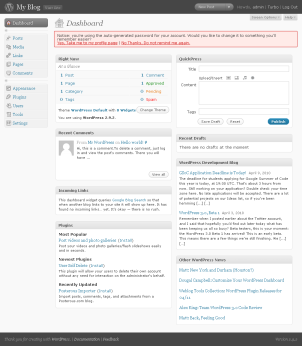
After you login, you are brought to the dashboard. This page has snapshots of the most important information you need to keep track of for your site.
Warning
Right at the top of your page is a red box with a warning. Normally, we would advise you to follow it's directions, but for this workshop you can ignore it.
Right Now (Statistics)
This shows you some useful stats like how many posts and pages are on your site. It also shows you how many comments are waiting for your approval. Each of these stats can be clicked on to perform the most common action. For example, if you click on "Pending" you will be taken to a screen to approve comments.
QuickPress (Quick Post)
Here you can type in a quick blog update and post it to your site.
Recent Drafts
This block shows you all your blog articles you've started and haven't published yet. By clicking on a draft you can continue editing the post.
News and Other Info
Most of the page has many sections of news and information about WordPress in general. You can safely ignore these news sections, but we recommend you glance at them from time to time. After a while you will start to follow the topics and they will lead you to many cool features and events in the WordPress world.
Step 4) Click on Settings in the left-hand menu.

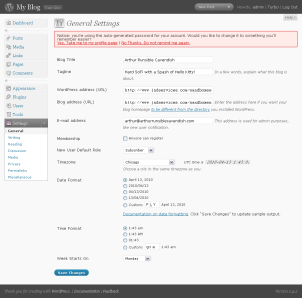
This will display the General Settings page of the administration section. You won't have to visit this area very often, but we need to do some initial setup.
Step 5) Enter your Blog Title.
We suggest using the same name as you will have printed on the cover of your book. If your books say (or will say) "Arthur Runsible Cavendish" then use that.
Step 6) Enter your Tagline.
If you don't have a Tagline leave this blank. You can always fill it in later. For Arthur, he will enter the Tagline "Hard SciFi with a Spash of Hello Kitty!"
Step 7) Enter your email address.
You can skip the fields that have URLs. They are fine.
You do need to enter your email address. The site will use this address when it needs to send you notifications.
Step 8) Select your Timezone.
The dropdown values are sorted by continent and then by alphabetical order. It is often easier to scroll through the list instead of trying to type values to select the nearest large city to you.
Step 9) Click the Save Changes button.
Step 10) Click the Visit Site Button.
This button is at the very top of the screen right next to your blog title. This will take you to your site to see the changes you made. If there are any mistakes just follow these instructions again to fix them.
Congratulations
You now have a personalized site online. As you go through the next few lessons you will learn what you can do with it.